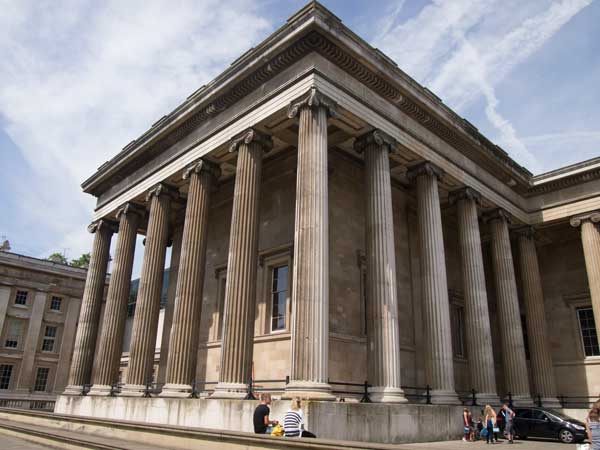
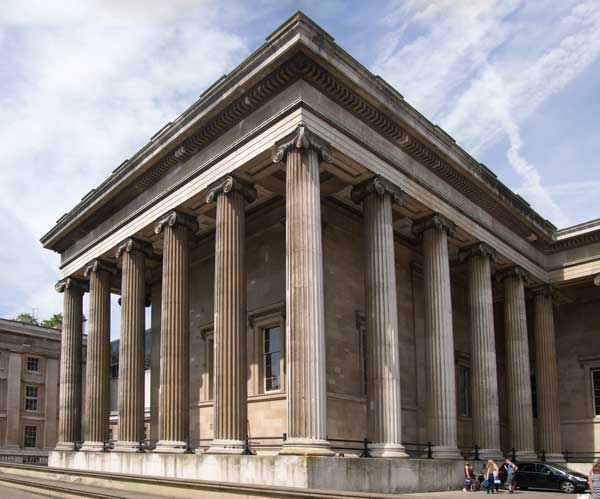
There are many different ways of working with Photoshop, and I thought I’d share how I changed the top image which was straight out of the camera, to produce the lower image.
What you will see in the lower photo is that the couple sitting on the wall have disappeared and there is some sky above the building. And of course, the walls of the building are now vertical instead of converging.
Cloning out the couple is straightforward.
The only tip I would give is to use the Polygonal Lasso tool to mask off bits where you don’t want to clone to intrude, and use a soft setting and the ‘replace’ option (rather than the ‘normal’ option) for the clone tool.
Dealing with converging verticals (assuming you want to, of course) is a problem if you don’t have enough space around the subject.
In the case of this shot of the British Museum, if I had stood further back to reduce the verticals and give me more space to work in Photoshop, I would have introduced other elements (other visitors to the museum) into the frame.
And I wanted to work with a wide lens close up to show the drama of the building.
By the way, the photo just shows one wing of the museum, and not even the imposing entrance. There were crowds of people near the entrance and I liked the look of the columns on this wing, so that’s what I shot.
So, how to correct verticals when there is not enough space in the frame?
The answer is to make the frame bigger.
In this case, because I had enough space at the sides but not at the top, I increased the canvas size as you can see here. You will find this option under Image / Canvas Size
You can choose any colour for the extension to the canvas size.
When you have a blank background to the original image, you may as well pick that colour for the extension.
In this case, I had a variable sky above the building, so I just used a greyish colour for the extension. Any colour would have done equally well.
Once you have increased the canvas size, there are several tools you can use to correct verticals, including the Perspective tool.
But I prefer to work freehand with the Distort tool.
The tools are under the Edit button, but they will be greyed out.
To make the tools available you have first to select the whole image. I select the whole canvas – including the extra space you have created with the Canvas Size tool.
Then push and pull the Distort tool handles until you get the verticals vertical.
Pulling the sides of the building vertical has the effect of shortening them, so now the building will be too squat.
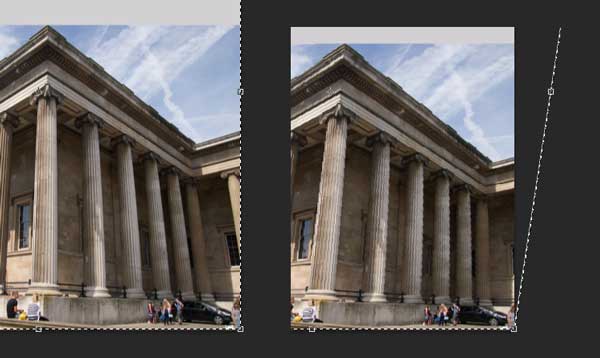
You can see here how pulling the handle of the Distort tool has made the whole image shorter. It can be corrected, however, in the next stage.
Deselect and then select the whole image again. Now use the Scale tool (Edit / Scale) and pull the building up until it looks to be its correct proportions.
Then I added the extra sky with the clone tool and that completed the image.


All this makes me really miss Photoshop!
Do you have that, where you have to pay for the rest of your life?
LikeLike
I have the ‘it’s on my computer and not some lousy subscription model’ version.
I bought CS6 as an upgrade to CS5, as an upgrade to… etc.
I think CS6 is the last of the non-subscription versions unless Adobe change their minds.
What do you have? (Or not have?)
LikeLike
I had not CS5 … and I don’t know what to do. I really loathe the other, free ones. Nothing else measures up.
LikeLike
How about Photoshop Elements ?
LikeLike
I need to read up on these things … don’t know what it does. Used to create stuff in PS, not only photo editing, and that’s the part I miss the most. I have Aperture now for photo editing.
LikeLike
You mean read up about Elements versus the full Photoshop version?
Elements is a cut-down version. I had Elements 8 or 9 that I got it free with a Panasonic GF1. I recall that it could only edit in 8-bit so it was no good for me because colours changes are much less forgiving in 8-bit than in 16-bit. I don’t know whether the newest version has 16-bit editing.
LikeLike